Be strong and we will show no fear
Be brave and we will not submit
Do not yield and we will believe
Do not doubt and we will persevere
We will conquer all
(From Slow Food Edmonton)
We are pleased to announce a hands-on food conference April 30th, 2011: Eat Alberta, A Celebration of Our Local Food Heroes.
As we are so passionate about the local food opportunities our city provides as well as acutely aware that food expertise (in a variety of forms) lies within each of our neighbourhoods. This is our first Eat Alberta conference of what we hope to be many that will celebrate such local food heroes.
This is a DIY conference! Some of the hands on sessions include:
• Sausage making
• Cheese making demonstration
• Apple pie and pastry making
• Bread making
• Pasta making
Tasting sessions include:
• Fruit wine tasting
• Honey tasting
• Coffee tasting
• Canadian wine and cheese pairing
• Goat Cheese Tasting
We are asking everyone to sign up at out website: www.eatalberta.com to receive conference updates.
There will also be an opening and closing key note session (urban gardening and urban homesteading)
What the day looks like:
8:30am to 5pm
Continental Breakfast followed by the morning Key Note
Two morning break out sessions from 8 choices
A charcuterie and cheese Tasting lunch with artisan breads
Two afternoon break out sessions from 8 choices
Closing session followed by a wine down
For more information, contact Valerie Lugonja: A Canadian Foodie
We would love to see a total BLOG OUT!
Valerie Lugonja: A Canadian Foodie
Conference Chair
Conference Members and Founders:
Sherene Khaw: Brulee Blog
Allan Suddaby: Button Soup
Sharon Yeo: Only Here for the Food
Mack D. Male: MasterMaq
When you try some foods and you decide you don’t like it, do you ever go back and make sure you don’t like it?
I think it’s a good thing to always check again, lest you deny yourself one of life’s simple and essential pleasures.
I think it was those baked-I-don’t-know-when packaged shortbread cookies that always seemed to appear at random times in the cupboard that crumbled into a pile of dry, tasteless crumbs. For a long time I never liked short bread.
Until I made my own.

Technically, I made Jamie Oliver’s Shortbread from Cook with Jamie: My Guide to Making You a Better Cook
The recipe was pretty easy. The only additional things you’ll need that the recipe does not mention is, a strip of parchment paper to make a sling. (basically cut a sheet of parchment to the width of the bottom of your pan, with enough sticking up past the top of the pan so you can lift the shortbread out)
The Best Shortbread in the World
1 cup, plus 2 tablespoons unsalted butter, at room temperature, plus extra for greasing
1⁄2 cup plus 1 tablespoon superfine sugar (aka: Castor sugar), plus extra for sprinkling
2 scant cups all-purpose flour, sifted, plus extra for dusting
2⁄3 cup semolina or 1 scant cup cornstarch
1. Preheat oven to 300 degrees. Create your parchment paper sling, and place into 9-inch square pan. Butter parchment and exposed sides of pan. If not using a sling, butter just butter the sides.
2. Cream your butter and sugar together with a whisk or wooden spoon, or mixer until pale, light and fluffy. Add the flour and semolina or cornstarch. Mix very lightly with a wooden spoon and then your hands until you have smooth dough.
3. Transfer your dough to a floured parchment paper covered surface and roll it out until it’s an even 1-inch thick all over. (if you don’t use parchment, you will have a harder time sliding the dough into the pan) and press the dough into your pan, poking it into the corners with your fingers — don’t worry about it having to look perfect. Prick the dough all over with a fork, then pop it in the pre- heated oven for 50 minutes until lightly golden. When it’s still warm, sprinkle with a generous dusting of sugar. Allow the shortbread to cool slightly.
4. If using a sling, lift the shortbread out of the pan gently, and place onto a cutting board and slice into at least 12 pieces. Otherwise, cut in the pan.
Childhood memories of food and family.
One of those rare times, my dad would appear with one of those ubiquitous buckets.
That aroma of those eleven herbs and spices wafting through the cardboard and paper bag. There were no mashed potatoes, but there were fries.
Corn fresh from the can.
And rice.
Even rarer, my grandfather would make his fried chicken. Not quite the Colonel’s, but it wasn’t shake and bake either. He did have a tendency to over char the chicken, but always tasty. Like most kids, I always went after the drumsticks first.
I don’t go for the drumstick first anymore, but I’m always ready for fried chicken. Especially, homemade, spicy, buttermilk fried chicken.

When done right, I’ll even have a piece of the white meat.
Spicy Buttermilk Fried Chicken
(modified from Cook’s Illustrated – basically increased the black pepper, cayenne and used Habanero hotsauce)
Makes 8 pieces
1 1/4 cups buttermilk
Table Salt
Hot Sauce (Habanero)
4 tsp black pepper (originally 3 tsp)
2 tsp garlic powder (originally 1 tsp)
2 tsp paprika (originally 1 tsp)
2 tsp cayenne (originally 1/4 tsp)
3 1/2 pounds bone-in, skin-on chicken parts. (8 bone-in, skin-on thighs work well)
2 cups all purpose flour (unbleached)
2 tsp baking powder
1 3/4 cups vegetable oil
INSTRUCTIONS
Brine the Chicken (1-24hours)
1. Mix 1 cup buttermilk, 1 1/4 tablespoon salt, hot sauce, 2 teaspoon black pepper, ¼ teaspoon garlic powder, 1 teaspoon paprika, and 1/2 teaspoon of cayenne together in large bowl or large freezer bag. Add chicken and coat. Refrigerate, covered, at least 1 hour or up to overnight.
Flour and cook the chicken
2. Adjust oven rack to middle position and heat oven to 400 degrees. Whisk flour, baking powder, 1 teaspoon salt, and remaining black pepper, garlic powder, paprika, and cayenne together in large bowl. Add remaining ¼ cup buttermilk to flour mixture and mix with fingers until combined and small clumps form. Working with 1 piece at a time, dredge chicken pieces in flour mixture, pressing mixture onto pieces to form thick, even coating. Place dredged chicken on large plate, skin side up.
3. Heat oil in tall sided large 11-inch dutch oven medium-high heat to 375F degrees. Carefully place 4 chicken pieces in pan, skin side down, and cook until golden brown, 3 to 5 minutes. Carefully flip and continue to cook until golden brown on second side, 2 to 4 minutes longer. Transfer chicken to wire rack set in rimmed baking sheet. Remove any fried bits. Repeat with other 4 pieces of chicken.
4. Bake chicken until instant-read thermometer inserted into thickest part of chicken registers 160 degrees for breasts and 175 for legs and thighs, 15 to 20 minutes. (Smaller pieces may cook faster than larger pieces. Remove pieces from oven as they reach -correct temperature.) Let chicken rest 5 minutes before serving.

dribbling down your chin and off your fingers
hot
messy
drippy
gooey
What more can you describe the perfect cheeseburger with?
Still on the eternal quest for the perfect cheeseburger made at home. A burger wasn’t exactly a staple at home, unless it was ground up, frozen, and shipped to your market freezer about 6months ago. Not to mention the occasional trip to the ubiquitous land of a dancing clown, talking cheeseburgers and a purple monster under those glowing golden rod arches.
I remember the occasional BBQ in the backyard, doused with the chemical char of starter fluid. The rare cookout in the park, meat cooked over an open flame, they all carry the smell of charred smoking fat sizzling on the flame. They scent is a memory trigger, and there’s no better than the smell of charcoal laced with super flammable starter infused into your fatty dripping charred slab of beef.
My latest has been a simple sirloin and chuck burger, with sauteed garlicy Cremini mushrooms, topped with swiss on a toasted bun.
A little Julia Child “American” potato salad (from
Julia and Jacques Cooking at Home) on the side helps- which, I have to say, is some of the best potato salad I’ve ever tasted.

Sticky.
Gooey.
Hot.
Savoury.
Chicken wing memories.
I’m sure the first taste of a chicken wing came from the family wok. Braised and sticky with a copious pile of black beans. It was one of the classic dishes from my grandparents. A serving of wonderful soup, and that time-honoured bowl of rice, which, despite my best efforts as a kid, I could never seem to escape.
The second taste came marinated in soy and sugar, off the neighbour’s hibachi. Like Pavlov’s bell, the dipping fat hitting the heat filled your mouth with drool as it filled the block with smoke.
Fast forward a few years, the first time I cooked them for myself, the wings came out of a plastic bag full of I-have-no-idea-when-it-was-made spices and bread crumbs. While I don’t think I’ve touched a box of Shake n Bake in over a decade, it seems like the rest of the world has discovered chicken wings in that time. Typically, the home chicken wing tends to be greasy, fatty, and messy. Although some would argue that’s half the fun.
Easier and cleaner than the deep fryer, but not the impatient, we end up in the oven.

Spicy BBQ Oven Wings
(Taken from Mark Bittman)
Ingredients:
8 medium sized wings (or 16 wing pieces and/or drummettes)
Coarse Salt
Fresh cracked Black Pepper
Habanero Hot Sauce to taste
1/4 Cup BBQ Sauce (Cattleboyz, or homemade is good)
2 tbls Oil
Equipment:
Parchment Paper
Large Baking Sheet/Pan
This recipe is based on using convection. If you don’t have convection, increase the time for the 1st two bakings by 5minutes.
Preheat oven to 375F w/convection
1 In a medium bowl, toss wings with oil, salt and pepper (season lightly if doing Salt n Pepper wings)
2 Mix bbq sauce with desired amount of hot sauce to taste.
3 Place a large sheet of parchment paper in pan, making sure it overlaps the rim/edge to keep drippings in, spread wings out, flat side down. Bake 25 minutes on the middle or lower middle rack (not the bottom)
4 Remove pan, drain off fat, and flip the wings. Bake another 15min, remove and drain any remaining oil from pan, place wings in clean bowl.
5 Increase oven to 450F. Toss wings with BBQ sauce and spread out on pan flat side up and bake for 7-10min until crispy, slightly charred. Let cool a few minutes before serving.
Variations:
Salt n Pepper:
Lightly season wings with salt before going into the oven. Instead of tossing in BBQ sauce, sprinkle wings with course salt and pepper.
Buffalo:
1/4 cup mild hot sauce (Franks, Durkee’s, Lousianna, etc) + a dash of tabasco or habanero – edit: I actually use Franks Xtra Hot
4 tbls unsalted butter, melted
2 tbls sherry vinegar
1 tbls minced garlic
1-2 tsp turbinado/raw sugar (optional)
Mix ingredients to make sauce, use in place of bbq sauce. This is enough sauce for about 16 full wings (32 winglets/drumettes). Recipe can be easily halved.
After tossing the wings in the hot sauce and placing back in the pan, spoon some sauce on top of the wings.
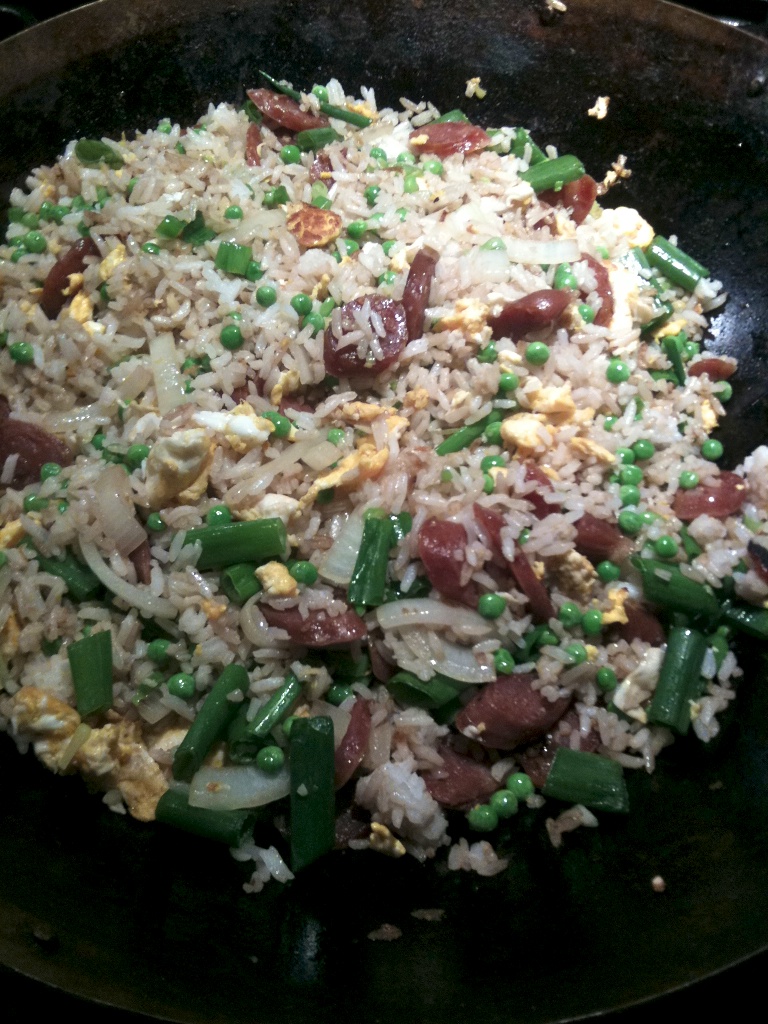
One of the earliest foods I remember from my childhood.
Rice was a given.
A staple.
But fried rice, was always a treat.
The Lap Cheong (Chinese sausage) is pre-cooked when the rice is steamed the day before. I still use the same brand that she did, Wing Wing, which has been made in Canada since the 1900s, when the founder emigrated from China to Vancouver from Canton (now Guangzhou).
This very close to my grandmother’s recipe, as far as I can remember. Instead of sausage, left over BBQ duck or pork also works very well.
Ingredients
2 eggs, lightly beaten
3 links Lap Cheong (Chinese sausage) (3-4 is better)
1 small knob of ginger, minced
2 cloves of garlic, minced
2 green onions, whites sliced thin, and greens into 4cm planks
1 small onion, sliced into half-moons
1 1/2 cups frozen peas
3 cups day-old rice (break up the lumps)
Soy sauce
White pepper
Cooking oil, such as peanut or good canola
Sesame oil (optional)
First the basic technique:
The day before, place the sausage on top of your rice/water before steaming. The rice will take a little bit longer to cook, but it will flavour the rice and the sausage will come out plump and juicy.
If you haven’t eaten all your rice and sausage, cool it to room temp, cover and put in the fridge.
The day of, do all your mise en place, take out the rice, slice the sausage on the bias. The amount of ingredients will vary depending on how much rice and sausage you have on hand.
Heat up your wok, add 2 tablespoons of oil to the pan when hot. (If you’re using a non-stick wok, first, for shame! Make sure you add oil to pan before heating – never heat up an empty non-stick pan) Quickly soft-scramble your eggs and reserve. (variations of egg, discussed below)
Heat another tablespoon of oil, quickly stir-fry sliced onions, the whites of the green onions, and ginger. Add garlic and stir-fry until fragrant, apx 30 seconds and reserve.
Increase heat, add another tablespoon of oil to your wok. When hot, add rice and break up any remaining lumps and stir fry your rice until it starts to crisp a bit.
Add reserved eggs, onions, lap cheong, and peas. Cook until peas are done and sausage is juicy and hot. Season with white pepper, soy sauce, and a drizzle of sesame oil.
Remove from heat and serve immediately.
Variations, egg theory
“Golden” Fried Rice:
Beat 3 eggs, mix into the day old rice – ensuring every kernel of rice is coated with egg before stir frying.
“Chunky” Eggy Fried Rice:
Instead of soft scrambling your eggs first, before adding back all the onions back to the wok with the rice, make a well exposing the bottom of the wok, add the eggs to the wok and scramble the eggs
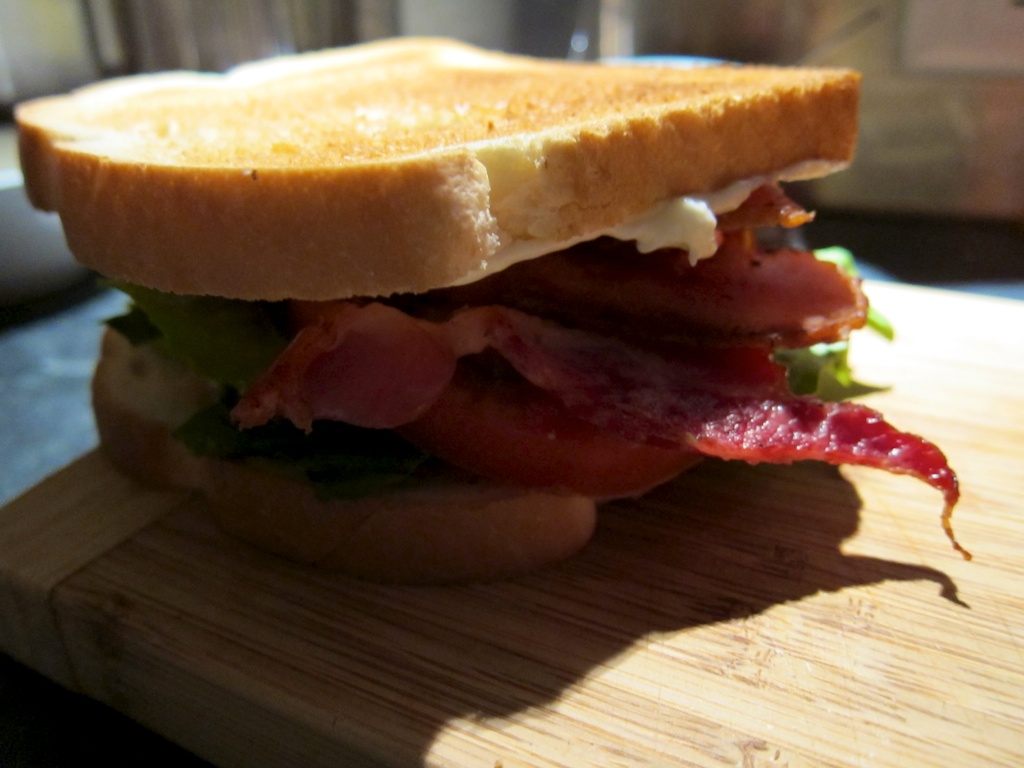
When everything comes together.
Harmony.
The crunch of the still warm toast, the cool soft crunch of the lettuce, and the juices of ripe tomatoes getting squeezed out with every bite.
The perfect combination of smokey, salty, crisy, meaty, fatty bacon
The little dab of mayo that always seems to find it’s way down your lips.
I don’t remember having my first B.L.T. but I was pretty young. Maybe around 6 or so. Not much has changed except my sister doesn’t cook it for me anymore and I’ve added a few grinds of fresh pepper over the tomatoes.

The first taste.
Deep.
Intense.
Fiery.
Not too sweet. Floral. Cool to the lips.
You never forget your first taste.
2oz gin
1oz vermouth
good olives
ice
water
Fill martini glass with ice and water.
Fill your cocktail shaker with ice. Add vermouth and stir.
Pour off most of the vermouth for a dry martini.
Add gin, and stir.
Pour off ice and water from your martini glass. Strain gin into your glass.
Serve with olives.
Makes one perfectly dry martini.
Sometimes tastes come from unexpected places. After reading countless articles about David Chang and Momofuku and seeing the recipe posted for his Ginger Scallion sauce, I decided to give it a try.
The “sauce” stirred up childhood memeories of when my grandmother would bring back a simple poached chicken from Chinatown. On the side they would give you a small container of minced ginger, green onions, mixed with oil and salt. After trying this version from David Chang, it made me crave a simple poached chicken.
David calls for really whatever you have on hand, such as his Bamboo Shoots (page 54 of Momofuku), Quick-Pickled Cucumbers, pan-roasted cauliflower, a pile of sliced scallions, and a sheet of toasted nori.
After seeing I was running low on dried shiitakes, I hit the store. The randomness of my grocery store always makes for an interesting way to try to get a recipe done. This time they had no dried shiitakes – but they did have fresh ones and along with fresh snow peas, and a packages of noodles, I was in business.
I sauteed the trimmed snow peas and mushrooms in a little oil with a touch of black pepper, and served it with a bit of leftover pan seared beef, and a squirt of hoisin.
The noodle sauce was very good. But, after taking a mouthful of noodles with that pungently rich and intense sauce, I took a bite of a fresh shiitake and I was overwhelmed by the unexpected deep earthy flavour of the mushrooms. It was like tasting a mushroom for the first time. I never knew a simple mushroom could be so surprising.
When someone asks you what “unami” is, this, something so simple, absolutely what you should serve them.
But I still want my grandmother to bring me a chicken back from Chinatown.
Excerpt from:
Momofuku
Ginger Scallion Noodles and Ginger Scallion Sauce
Our ginger scallion noodles are an homage to/out-and-out rip-off of one of the greatest dishes in New York City: the $4.95 plate of ginger scallion noodles at Great New York Noodletown down on the Bowery in Chinatown.
Ginger scallion sauce is one of the greatest sauces or condiments ever. Ever. It’s definitely a mother sauce at Momofuku, something that we use over and over and over again. If you have ginger scallion sauce in the fridge, you will never go hungry: stir 6 tablespoons into a bowl of hot noodles–lo mein, rice noodles, Shanghai thick noodles–and you’re in business. Or serve over a bowl of rice topped with a fried egg. Or with grilled meat or any kind of seafood. Or almost anything.
At Noodle Bar, we add a few vegetables to the Noodletown dish to appease the vegetarians, add a little sherry vinegar to the sauce to cut the fat, and leave off the squirt of hoisin sauce that Noodletown finishes the noodles with. (Not because it’s a bad idea or anything, just that we’ve got hoisin in our pork buns, and too much hoisin in a meal can be too much of a good thing. Feel free to add it back.)
The dish goes something like this: boil 6 ounces of ramen noodles, drain, toss with 6 tablespoons Ginger Scallion Sauce (below); top the bowl with 1/4 cup each of Bamboo Shoots (page 54 of Momofuku); Quick-Pickled Cucumbers (page 65 of Momofuku); pan-roasted cauliflower (a little oil in a hot wide pan, 8 or so minutes over high heat, stirring occasionally, until the florets are dotted with brown and tender all the way through; season with salt); a pile of sliced scallions; and a sheet of toasted nori. But that’s because we’ve always got all that stuff on hand. Improvise to your needs, but know that you need ginger scallion sauce on your noodles, in your fridge, and in your life. For real.– David Chang
Ingredients
2 1/2 cups thinly sliced scallions (greens and whites; from 1 to 2 large bunches)
1/2 cup finely minced peeled fresh ginger
1/4 cup grapeseed or other neutral oil
1 1/2 teaspoons usukuchi (light soy sauce)
3/4 teaspoon sherry vinegar
3/4 teaspoon kosher salt, or more to taste
(Makes about three cups)
Directions
Mix together the scallions, ginger, oil, soy, vinegar, and salt in a bowl. Taste and check for salt, adding more if needed. Though it’s best after 15 or 20 minutes of sitting, ginger scallion sauce is good from the minute it’s stirred together up to a day or two in the fridge. Use as directed, or apply as needed.
Of course, I couldn’t find any sherry vinegar. I substituted real sherry and rice wine vinegar.

